Showing posts with label kitchen. Show all posts

Monday, 25 February 2013

The Family Table

There are studies showing that families that eat meals together tend to stay together. It's an interesting concept, and obviously not always true, but in my personal experience, family meals are extremely important.

I'm so thankful to my parents for instilling in me the importance of eating dinner as a family. Yes, it's only J & I right now, and meals may end up getting eaten in front of the TV once and a while, but rarely does one of us eat without waiting for the other.

So although my must-have list is really not all that long, room for a large dining table is a must in our next home. If we were to have our immediate families over for dinner together - including parents, siblings, sibling-in-laws - we are looking at 13 ridiculously good-looking folks!

That being said, I find myself really drawn to a rustic farmhouse style table. But, a touch of chic by adding gorgeous chairs, or a dramatic chandelier. Something to add some glamour to the room. Here are a few dining rooms that I've fallen for.
Huge rustic table, modern white chairs
Link from Pinterest (via)

Herringbone floors, crystal chandelier, linen & nailhead upholstered chairs
Link from Pinterest (via)

Simple modern chairs, oversized chandelier, fresh flowers
Link from Pinterest (via)

I absolutely love the modern chairs in the first picture. Here's a way to really glam them up - 

I'm hoping that a dining room table is something we can tackle on our own. How fun would it be to feed our children someday at a table we built ourselves? Hopefully Ana White can help us out!

Have a wonderful Monday! J and I are off to see Imagine Dragons perform tonight. One of J's Christmas gifts from me. I know, I'm an awesome wife. Can't wait!

xoxo, T


If you like this post please let me know by leaving a comment or liking my Facebook page. You can also follow along on Twitter, Pinterest, and Instagram. Woop! Woop! Thanks!

Tuesday, 22 January 2013

Kitchen Storage

The other night I stumbled upon a blog post that I haven't stopped thinking about. This lightbulb went off for me and all I could think was, wow what a fantastic idea.

I can take no credit for this whatsoever. But it was too neat not to share. How to re-vamp an old hutch into useful, dare I say modern, kitchen storage. There are so many Ikea hacks today to turn plain jane Ikea furniture into built-ins, but why not take an old hutch with character and revamp it? I followed in Emily's footsteps and did I very quick craigslist search for the Boston area....omg there are hundreds. Here are a few I found for less than $200.


Here's an example of a finished product. I love it!

As I mentioned on Friday, I visited several open houses on Sunday afternoon with my mom. It was really interesting. And eye-opening. J & I have decided to work with a very limited budget in the hopes of keeping our condo, paying down school loans a little quicker, being able to travel still, etc. So many of the homes need work, some need a lot of work... I'm down for some work definitely. And like I've mentioned, J would like to totally revamp an old home. Seeing ideas like this gets me really excited to think about the possibilities of updating a space to exactly what we want.

Thank you Emily for sharing such a fantastic idea! 

Another route to go if you're feeling adventurous? Build your own rustic hutch. Um, how amazing is this? Definitely not modern, although is rustic the new modern? Who knows, but I do know that this is a fabulous piece that I would welcome into my home any day.


If you haven't heard of Ana White, I suggest you read up.  Woodworking genius! I bought her new book this fall and cannot wait to build something have J build me something!


I hope you find these ideas as inspiring as I did. Not only are older pieces of furniture made better than many pieces today, it's nice to go green and reuse something, and I'm sure the wallet doesn't mind either!


Wednesday, 28 November 2012

DIY Table: Spraypainting

So remember that table & chair set I showed you Monday? Well, let's start at the beginning, shall we? First things first, I had to figure out how in the world I was going to pick up a table and six chairs. After emailing back and forth with the seller, we realized that the white van currently in my parents' possession would fit the table with room to spare. Flip the table over and rest the chairs on it, perfect!


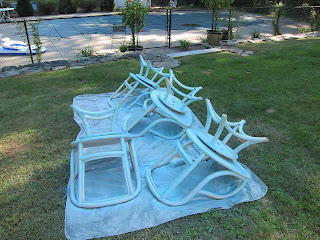
Once back at my parents, it was time to clean up the chairs. First things first we sanded them down. There was a bit of a sheen to the chairs so we weren't sure what the finish was. After a quick wash down,  we sanded first with a medium grit, then fine grit.

In the picture below on the left, you can see the broken chair caning that was left in the chair. This stuff was gnarly and sharp. On Day 1, I didn't think we'd actually recane the chairs. So instead we took a utility knife to the broken pieces and then used caulking to fill the holes. (This was a VERY bad idea when we then changed our minds and wanted to recane the chairs....)

 Once cleaned up, it was time to prime and spray paint!

My original idea was to use a deep plum on these chairs. I envisioned it looking so rich next to an off-white bench. But we couldn't find the right purple for my vision. And the more I thought about it, the more I realized that something lighter would look much better against our gorgeous cherry floors. So I let my mom talk me into a light aqua instead. And I am SO glad she did! Blue Ocean Breeze to be exact.

DIY rookie mistake...not buying enough spray paint! Oh my....we went through a lot of spray paint. I was trying SO hard to do light even layers that I probably sprayed a little too far away. Paired with the wind that day, I'm pretty sure half of each can ended up on the lawn, woods, in the air. Oh, and apparently we chose a very popular color! Took us 3 different Michaels stores (and 4 different trips) to get enough spray paint.

But once we saw the spray painted caning (one chair had the caning intact), we knew it had to be. And I ordered the caning supplies online that night.

Monday, 26 November 2012

DIY: New Kitchen Table

It's time to share with you our new kitchen table & chairs. There is one more thing I'd like to add in the future, but I can't wait any longer to show you what we did.

We've had J's college bar height table and stools since we moved here. And we had it in our apartment before. And I had it at my apartment out of school with girlfriends. It is a great table that we certainly loved, but I've wanted something different since we moved here. Time to replace the final college furnishing! But I never wanted to spend a ton of money on something that may not fit in our next home.

Well when I saw this inspiration photo, I had to figure something out. Fast too! Enter Craigslist. My new best friend.


$75 for a "let's see what happens" DIY project, yes please! And thank you Mom for taking me to pick this gem up. We looked pretty awesome in our van. Ha.


Day 1 included cleaning, priming, and spray painting the chairs. I plan to share more details later this week as to exactly what we did but here's a quick highlight.

This project was trying, very trying. And it definitely made us think outside the box at times. Like, how the heck do you recane a chair?! Oh ya, we figured it out. Probably not the "right" way but that is totally fine with me!


After many weekends of working on this project, it is so nice to say it's done. Looking pretty different than before huh? I am so proud of our first DIY project! 
We purchased the bench from Ballard Designs - the Coventry Bench - and LOVE it. It is my go-to seat in our kitchen now. So comfortable. Great place to blog from too. :) The pillow is pulled in from the living room for now, but I have my eye out for something new.

It was definitely strange at first to see a chair height table in our place after so many years with a high table. But it didn't take long to get used to it. The chairs swivel and are so comfortable to sit back in, with your feet actually touching the floor! 

In time, most likely after the holidays, I'd like to order a glass top for the table to protect it. And also because I think the glossy top will look great.

And lastly, at some point, probably Spring, we plan to paint this room. I knew even before we put the off-white bench in that it would look great against a gray or white wall, not the minty-green our place came painted as. The one room we haven't touched yet. There is A LOT to paint....but it must be done.

Stay tuned for more details of our process for re-vamping these chairs! It was definitely a learning experience. 

Thursday, 4 October 2012

Color in the Kitchen

How do you feel about a little color in the kitchen? These colorful islands and grey cabinets have caught my eye and have me thinking, maybe a little color isn't so bad?

Plum island, butcher block
 via

Grey open cabinets, butcher block, subway tiles
 via

Grey cabinets, off white island (with built in dog bowls!)

These grey cabinets are a real contender in our future home at the moment. That, and of course the farmhouse sink - but that one's a given.